Wednesday, 29 May 2013

What's in my JustFab Bag?!

Hey!

After I realised my bag is too heavy I decided to re-organize and clean it. I usually keep the same bag for a week or more, as I know that when I change bags I always end up forgetting something and it is so annoying!

The 'whats in my bag' post is one of the most popular posts in beauty blogging..I love reading them  and I am sure many people love it too, but I don't know exactly why, maybe because a handbag is so personal and private...

I hope you enjoy what's in my JustFab bag! : )


What's in my bag

For the last 3 weeks now I have been using my Icon bag from JustFab in green, the size is perfect as I can fit everything I need during the day and at work. Also I love the interior separators which keep everything tidy! So here is what I carry with me during the day..

First of all my basic things like my wallet (Prada), mobile phone (iPhone), sunglasses (RayBan) and my keys. I always carry with me my phone charger, iPhone's battery runs out very quickly (I am addicted and check my Instagram all the time)! I bought this cool Muji mini notepad key ring for my keys and I am in love with it, I am super organised and I am always writing things down so I don't forget anything. I also carry my Swarovski butterfly USB, which has a chain and can be used a a necklace.   


Another thing I always carry with me in my day bag is my calendar (Cath Kidston), I think this is the thing I use the most in my life, I write everything down, payments, work notes, events, deadlines..I also have another notepad, a pink Moleskin, which I use only to keep my blog notes and ideas. Other things in my bag are some cute pocket tissues, a furry pen (gift from my friend)  and some pink and white M&S which were a gift from JustFab (I like to have snacks in my bag)!


I think it is very important to keep wet tissues and antibacterial lotion in our bags, I always use it after I take the tube or bus. I also carry with me a Botanics rosewater spray from Boots, which is great to refresh your skin.
I must have around 10 different lip balms and lipsticks in my bag and my boyfriend makes fun of me! I put all my makeup products in a small leopard makeup bag I bought from Primark, I have some hair clips, brush, some lipbalms, a small They're Real Benefit mascara,  Bourjois Healthy Balance powder with mirror,  a Garnier Eye Roll-On, a small size Porefessional Benefit primer, a concealer by PIXI and a Revlon PhotoReady Cream Blush. Always ask for sample products, they are great for your makeup bag and can even fit in a clutch!


So what's in your JustFab bag?!

I hope you enjoyed this post and thank you for reading!

Lots of Love

Nathalia
xxx 

Monday, 20 May 2013

Nails Of The Week! Model's Own Scented Nail Polish!


Hey!

Good Morning!

I hope you had a nice weekend! 

I love Mondays..It's the start of a new week!


This week I decided to do a pastel look for my nails. I bought the new Model's Own scented polishes and wanted to dry then like crazy! Not only the colors are super sweet, but they also smell like desserts..strawberry tart, blueberry muffin and banana!

I couldn't decide on the color so I did a mix of purple and blue! I didn't do them on my own, because the polishes are very thick and quite hard for me to paint them nicely..but I guess someone who is more used to it can do it easily. Their brushes are not very thick, I would say a medium size, the smell lasts for about 2 days, but if you use a top coat it does mask the smell. 


Model's Own Scented Nail Polish in Grape Juice

Model's Own Scented Nail Polish in Blueberry Muffin

Overall I really liked the Model's Own Scented nail polishes, I think they are one of the best pastel colors out there now!

I cant wait to try their new Summer Splash Collection!! 


You can buy the Model's Own Nail Polishes in any Boots, online or at the shops!

Or you can visit Model's Own official Website:


Extra Tip..

A nice idea..I use mason jars as a cute way to display and store my nail polish collection at the same time!
This way you can see all the colors you have and use them more often! 


Thank you for reading!

I hope you have an amazing week!


Lots of Love

Nathalia
xxx

Monday, 13 May 2013

New Homemade Vitamin Water Recipe! Berries and Coconut Water!

Hey! 

I did post a few months ago a citrus homemade vitamin water recipe, which I hope you enjoyed, but this time I have an even better recipe made with coconut water! To do your vitamin water you can use any fruits or herbs you like..you can be very creative and experiment! I decided to do this recipe with berries because I am going through a phase of eating lots of strawberries, although they are not even on my top 5 of favorite fruits..I know that's  strange, but anyway this recipe is super yummy and the coconut water makes all the difference, it gives and extra amazing taste!


Here is what you need:  
  • a glass jar (I am doing this recipe in a small jar for myself, so if you doing for more people just double the recipe)
  • coconut water
  • a handful of berries,blueberries, raspberries 
  • 5-6 strawberries
  • 1 grapefruit
  • 2-3 mint leaves (optional)


Preparation:
  • cut the grapefruit and strawberries in slices, no need to slice the berries
  • I remove the peel of the grapefruit, because it is too bitter
  • slightly smash the fruits with a wooden spoon, just enough to release some of their juices (raspberries are very sensitive so be careful not to smash them)
  • Fill half the jar with coconut water and a bit of still water if necessary,  add some ice
  • Then add the fruits and herbs
  • Allow it to infuse in the fridge for three to four hours or even better, overnight.


Some more tips...

You can refill the jar as you drink the water. Sometimes I also like to add some liquid or powdered vitamin C, which you can find in a pharmacy or health food stores. Cranberry concentrate is also great to add in this recipe! If you like your water sweet, just add some Truvia!

The vitamin water will last in the fridge for a about three days, it gets betters the longer it sits. 


I hope you enjoyed this recipe and thank you for reading!

Let me know if you like this recipe or share your own creative vitamin water recipe : )

Have a beautiful day!

Lots of love

Nathalia 
xxx

L'Oreal Skin Perfection: 3 in 1 Purifying Micellar Solution & 15 Second Miracle Cleansing Oil Review!

Hey!

Good Morning!
I hope you had a lovely weekend!

Today I am doing a review on some of  the new L'Oreal skincare cleansing products, the 3 in 1 Purifying Solution and the Cleansing Oil.

The new skincare range is called 'Skin Perfection' and it includes some face wash and scrubs as well, but I decided to get the cleansing oil as it is L'Oreal first oil and because I  love all the easy to use, no fuss makeup removers!


I loved this product, it is a water like clear liquid which removes easy and quick my mascara and eyeliner, my eyes dont sting and it didn't give me the eye blurring feeling I get from some makeup removers. However, to remove my concealer I had to rub a little bit more, but it is very gentle on my skin which is very sensitive.The best thing is that if you are really really bored or sleepy, no need to rinse it off..although we should always wash our faces : ) After using it, my skin feels refreshed and clean.  

L'Oreal Skin Perfection3 in 1 Purifying Micellar Solution

L'Oreal Skin Perfection3 in 1 Purifying Micellar Solution

3 in 1 Purifying Micellar Solution:
  • Dissolves make-up
  • Unclogs pores and removes impurities
  • Tones and soothes skin
How to use:
  • Wet, but not soak, a cotton wool pad
  • Hold it over your lashes, lids or lips for a few seconds
  • Then very gently, without rubbing, sweep away all the make-up
  • Rinse with warm water and gently dry pad your face


A few months ago I did a review on Shu Uemura Beauty Cleansing Oil, which I absolutely love and use all the time. But after using the L'Oreal Cleansing Oil for two weeks, I can say that I might like it a bit more than the Shu Uemura..(it is also much cheaper!). It has worked great for my skin, it removes all my makeup pretty well, it is not as runny as Shu Uemura, it didn't cause me any breakouts, it leaves my skin soft and hydrated but not greasy. It has a very discrete smell which reminds me of summer, kind of  like a coconut sunscreen..


L'Oreal Skin Perfection15 Second Miracle Cleansing Oil

15 Second Miracle Cleansing Oil: 
  • Instantly dissolves make-up even waterproof
  • Re-balances and Purifies for healthy looking skin
  • Lightweight and non-greasy
  • Suitable for all skin types
How to use:
  • With your fingertips apply 2-3 drops onto dry skin, massaging over the lashes, lids and lips.
  • Then rinse very well with warm water
  • Gently pat dry your face with a soft tissue or towel


To find these products just click on the images : )

Let me know if you have tried the new L'Oreal Skin Perfection range and if you liked it!

Thank you for reading and have an amazing week!

Lots of Love

Nathalia
xxx

Friday, 10 May 2013

The Ultimate Chocolate Cake Recipe!


My amazing Brigadeiro Cake!
Hey!

I hope you all had a great week! 

I want to share this recipe with you today, because it would be perfect for indulging during the weekend! My friends and family ask me to do this cake all the time. Its quite easy to make and delicious. I am 100% sure you will fall in love with it, so I suggest you start baking : )


detalhe receita
Brazilian Brigadeiros

This recipe is the cake version of the Brazilian candy 'Brigadeiro', which is a chocolate truffle very famous in Brazil, they serve it usually in parties and birthdays. It is a mixture of butter, powdered chocolate and condensed milk, rolled into small balls and covered in granulated chocolate. 


* I wanted to show you the whole process, using both, the round and the bundt molds so that you can choose which one you prefer. The recipe works for both, but I prefer the Bundt! The recipe and assembling is exactly the same, its just the shape that is different!

 Here is what you will need:

Batter
  • 3 eggs
  • 1 cup of oil (I like using olive oil)
  • 2 cups of flour
  • 1 cup of sugar
  • 1 cup of powdered chocolate (I love Nesquik)
  • 1 tablespoon of baking powder
  • 1 cup of milk (or double cream)
  • 1 teaspoon of espresso powder (you cant actually taste the coffee, but it really brings out the chocolate taste)
Filling and Topping
  • 2 tablespoons of butter
  • 1 whole can of condensed milk (Carnation is the best)
  • 5 tablespoons of powdered chocolate
  • 2-3 tablespoons of thick double cream (if you like a more runny filling, add more cream)
Syrup
  • 1 small cup of milk with 2 tablespoons of powdered chocolate 

Preparation:

Batter
  1. Preheat your oven
  2. Mix the eggs, sugar, oil and milk in a blender for a few minutes, until all ingredients are incorporated
  3. Sift the flour, chocolate and espresso powder twice, add to the mixture and mix for a few more minutes (sifting the flour will make your cake fluffy)
  4. Add the baking powder last, and mix it very gently
  5. Pour the mixture in a buttered and floured pan (I always do my cakes in a Bundt style pan, with the whole in the middle, it is much easier as the cake bakes evenly)
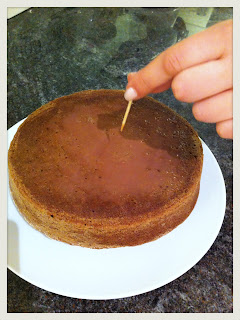
  6. Bake for about 30-35 minutes at 150 degrees, use a toothpick to see it the cake is ready. Insert it into the cake, if it comes out clean it means its ready!
  7. Let the cake cool down 
  8. Using a toothpick again, make many small holes in the cake and then pour with a spoon the syrup of milk and chocolate. This is a secret to keep you cake very moist! You can also add rum essence for a little extra : )
Filling and Topping
  1. Mix everything (minus the cream) in a small pan and cook in low temperature until it becomes thick (the perfect point for the Brigadeiro is when you can peel  it off the bottom of the pan)
  2. Remove from the fire, add the cream and mix well. The double cream you use should be very thick. In case you cant find it, dont use cream at all, otherwise the filling will be very runny.
Assembling
  1. Cut the cake in half. 
  2. In one half pour some of the filling mixture, then place the other half on top. 
  3. Pour the rest of the mixture on top of your cake and decorate it with the granulated chocolate
  4. Enjoy the best chocolate cake ever!!

Using the Round Mold


For extra decoration, if you use a round mould to bake your cake, make some small brigadeiros, by rolling the filling mixture into balls, and add them on top of the cake!It looks adorable!


Using the Bundt Mold


Start baking!!

I guarantee you everybody will love this cake!!

Thank you for reading and have a lovely weekend!

Lots of  Love

Nathalia
xxx